Title here
Summary here
PiRogue version >=2.0.0
This documentation only applies when the package pirogue-base version >=2.0.0 is installed.
Use dpkg -l to check what version is installed:
$ dpkg -l | grep pirogue-base
ii pirogue-base 2.0.2 all Install all PiRogue packagesThe PiRogue functionalities are all controlled and configured by the pirogue-admin tool.
pirogue-admin uses and writes its configuration files in the system folder: /var/lib/pirogue/admin.
By default, on a first and fresh installation, pirogue-admin detects and generates the
best configuration for the current system.
However, modifying this configuration must be done using the pirogue-admin-client tool after the initial installation.
After the installation of the system, it’s possible to get the current system configuration with the following command:
pirogue-admin-client system get-configurationThe result should look like:
DASHBOARD_PASSWORD: PiRogue
ENABLE_DHCP: 'True'
ENABLE_PUBLIC_ACCESS: 'False'
EXTERNAL_ADDRESS: 192.168.1.37
EXTERNAL_INTERFACE: enp0s3
EXTERNAL_NETWORKS: 192.168.1.0/24
ISOLATED_ADDRESS: 10.8.0.1
ISOLATED_INTERFACE: wg0
ISOLATED_NETWORK: 10.8.0.0/24
PUBLIC_CONTACT_EMAIL: root@pirogue.local
PUBLIC_DOMAIN_NAME: pirogue.local
PUBLIC_EXTERNAL_ADDRESS: 185.199.111.153
SYSTEM_HOSTNAME: pirogue
SYSTEM_OPERATING_MODE: wireguard
WIFI_COUNTRY_CODE: FR
WIFI_PASSPHRASE: superlongkey
WIFI_SSID: PiRogue
Under the hood, administrating a PiRogue consists in modifying these variables. Subsequently, lots of system files are updated and system services are started, stopped or reloaded accordingly.
With the wide variety of PiRogue’s new network capabilities, it could be hard to maintain a coherent and safe relationship between all the configuration variables, the system files, and the services.
This is why PiRogue offers two level of administration:
pirogue-admin: low-level administration tool (used internally, and must not be used directly)pirogue-admin-client: high-level administration tool aiming safety and ease of useNever use pirogue-admin
pirogue-admin must do be used directly, use pirogue-admin-client instead.
pirogue-admin-client is the tool to administrate high-level PiRogue features.
It allows you to configure many PiRogue components without having to deal
with the complexity of the system.
You can explore all its capabilities using the command line parameter --help, e.g:
pirogue-admin-client --helpThe tool is subdivided in sections on which --help can be shown, e.g:
pirogue-admin-client wifi --help
pirogue-admin-client wifi get-configuration --help
pirogue-admin-client wifi set-configuration --help
pirogue-admin-client system --help
# ... and so onDepending on system capabilities, the PiRogue is configured automatically in the adequate mode.
PiRogue supports 3 different operating modes:

The following command will tell you in what mode your PiRogue is running:
pirogue-admin-client system get-configuration | grep SYSTEM_OPERATING_MODEThe following commands applies to all operating modes. In the appliance operating mode, you can only configure the dashboard and open/close network ports.
The default username of the dashboard is admin.
As the password of the dashboard is randomly generated during the installation, the following command allows you to retrieve it.
pirogue-admin-client dashboard get-configurationThe password of the dashboard can be changed with:
pirogue-admin-client dashboard set-configuration --password 'mySuperSecretPassword!'The dashboard is accessible on https://<PiRogue IP address>/dashboard when the PiRogue is running in the modes access-point or appliance.
You have to trust the default self-signed certificate.
By default, the PiRogue blocks most of the network traffic coming from the isolated network except the traffic on the Internet. The PiRogue handles the DCHP and DNS requests from the devices connected to the isolated network. The network traffic from the isolated network to the external network is blocked.
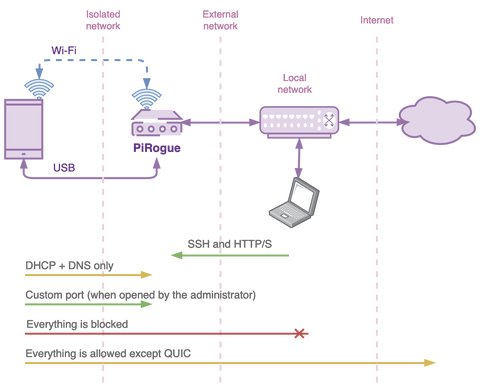
However, in some cases, the administrator might want to provide custom services hosted on the PiRogue to the devices connected to the isolated network.
To achieve this, the pirogue-admin-client offers the ability to open and close ports on the isolated network.
The following command list the open ports:
pirogue-admin-client isolated-network list-open-portsAnd the result looks like (if any ports are open):
- port: 8080
- port: 9090
As an example, if you want to open the port 8080 on the isolated network, use the command:
pirogue-admin-client isolated-network open-port 8080The administrator can close all the ports that have been manually opened at once with the command:
pirogue-admin-client isolated-network close-portIt is also possible to close a single port (e.g: 8080):
pirogue-admin-client isolated-network close-port --incoming-port 8080WiFi access-point mode
This section only applies if the current operating mode is Access-Point (a.k.a AP).
Check the output of this command to get the current operating mode your PiRogue is in:
pirogue-admin-client system get-configuration | grep SYSTEM_OPERATING_MODEBy default, WiFi password is generated at installation. The passphrase of the WiFi access-point can be found in the WiFi configuration.
To get the current WiFi configuration, use the following command:
pirogue-admin-client wifi get-configurationThe output looks like:
country_code: FR
passphrase: superlongkey
ssid: PiRogue
Use this information to connect a device to the PiRogue access-point.
The following command allows you to change the WiFi SSID and password:
pirogue-admin-client wifi set-configuration --ssid 'Investigation_Lab' --passphrase 'Hard to guess passphrase !'Use the following command to list the parameters that can be configured:
pirogue-admin-client wifi set-configuration --helpWireguard mode
Only applies if the current operating mode is VPN (a.k.a Wireguard).
Check the output of this command to get the current operating mode your PiRogue is in:
pirogue-admin-client system get-configuration | grep SYSTEM_OPERATING_MODEAdd a new Wireguard peer:
pirogue-admin-client vpn add-peerThe result will look like:
idx: 3
private_key: YGe5EF//sIj6QF/2sglmx20b7jxgxFpV1sl8hXBDy34=
public_key: 8lSksu3/HF8vCGi5lCOktI3C9L68PsfNhzDwyuAtMQ0=
To get the list of the currently configured peers, use the command:
pirogue-admin-client vpn list-peersThe result will look like:
- idx: 2
  private_key: oA3PBMH5yhBCIykx1odFPbnH+QKq18FBPmdPU1MrmEQ=
  public_key: hdlwEsh7SQ0lEPC5Qpl66y9slJkhH4wUYEpzvkEq6V4=
- idx: 3
  private_key: YGe5EF//sIj6QF/2sglmx20b7jxgxFpV1sl8hXBDy34=
  public_key: 8lSksu3/HF8vCGi5lCOktI3C9L68PsfNhzDwyuAtMQ0=
To delete a peer, you have to specify its index (idx):
pirogue-admin-client vpn delete-peer 2To connect a peer to the Wireguard VPN, you first need to get its configuration. The peer configuration is returned by the command:
pirogue-admin-client vpn get-peer-config 3The result looks like:
[Interface]
Address = 10.8.0.3/24
PrivateKey = YGe5EF//sIj6QF/2sglmx20b7jxgxFpV1sl8hXBDy34=
DNS = 10.8.0.1

[Peer]
EndPoint = 185.199.111.153:51820
PublicKey = YxtvfgfpgCpkQKTI9vcVz0LnXGHIwF83Z65OBWw4F0A=
AllowedIPs = 0.0.0.0/0
PersistentKeepAlive = 20
You need to save the configuration of the peer in a .conf file to be loaded on the device. To do so, use the command:
pirogue-admin-client vpn get-peer-config 3 > my-peer-3.confAlternatively, you can generate a QR-code to be scanned with the Wireguard mobile app:
pirogue-admin-client vpn get-peer-config 3 | qrencode -t ansiutf8Opening the PiRogue to the Internet refers to the ability for a PiRogue to be reached via the Internet. This notion is crucial for security and PiRogue network configuration.
By default, the PiRogue dashboard and remote administration are not publicly exposed on the Internet.
Requirements
To make the PiRogue accessible from the Internet, you must have:
Let’s assume the following:
my-domain.orgcontact@my-domain.org185.199.111.153pirogue-lab.my-domain.org resolves the IP address of your PiRogue: pirogue-lab.my-domain.org. 3600 IN A 185.199.111.153185.199.111.153 is firewalled, reaching port 80 and 443 from Internet fully translates to your PiRogue respective portsTo Make the PiRogue accessible from the Internet, you have to run the following command on your PiRogue:
pirogue-admin-client external-network enable-public-access --domain pirogue-lab.my-domain.org --email contact@my-domain.orgOnce successfully done, the dashboard of your PiRogue is accessible on https://pirogue-lab.my-domain.org/dashboard.
Warning
Network knowledge is required to configure the remote administration system.
Depending on the network topology in which the administrator wants to perform remote administration, the configuration of the PiRogue and the administrator’s computer is different.
There are two main topologies possible:
Regardless of the administration network topology, you must install pirogue-admin-client on the administrator’s computer.
It can be done by adding our PPA and installing the required packages:
# Install PiRogue PPA
sudo wget -O /etc/apt/sources.list.d/pirogue.list https://pts-project.org/debian-12/pirogue.list
sudo wget -O /etc/apt/trusted.gpg.d/pirogue.gpg   https://pts-project.org/debian-12/pirogue.gpg
sudo apt update
# Install pirogue-admin-client
sudo apt install pirogue-admin-client
# If we want to generate QR-codes
sudo apt install qrencodeFirst of all, make sure to open your PiRogue to the Internet, see the instructions above.
To connect to the PiRogue remotely, the administration client uses an authentication token. To get this token, use the command:
pirogue-admin-client external-network get-administration-tokenThe following command will reset the authentication token:
pirogue-admin-client external-network reset-administration-tokenOn the administrator’s computer, run the following command to configure the administration client:
pirogue-admin-client --save --host 'pirogue-lab.my-domain.org' --port 50051 --token <administration token>And finally, test the communication between the administration client and the PiRogue with:
pirogue-admin-client system get-configuration